Making a Krita plugin
(If you haven't already, make sure to set up time tracking so you can exchange your coding time for prizes!)Before we can make a Krita plugin, we have to learn how to make a script in Krita.
Krita scripts are made with the Python programming language. I won't be going over the basics of Python in this guide, but there's many resources online to learn from: I especially like this short and sweet reference sheet.
Navigate to Settings 🡲 Configure Krita 🡲 Python Plugin Manager and enable the Scripter button. Then navigate to Tools 🡲 Scripts 🡲 Scripter to open the Scripter tab: this is a sandbox where you can run, edit, and save scripts. I encourage you to follow along the rest of this guide with the Scripter tab.
Type print("Hello world!") into the text editor and hit the run button. In the console below, you'll get an output that says Hello World!.
Intro to scripts
A Krita script is simply a Python file that changes Krita's behavior while it's running. To access Krita's internal workings, we'll use its API, which acts like an interface between Krita and our script. Any instruction we want to execute can be found in the krita library's API.
Go ahead and import all of the contents of the krita library into your script:
from krita import *
Almost all of the content in the krita library relies on the current 'instance' of Krita running. To get this instance, call the Krita.instance() function:
print(Krita.instance())
You'll get output that looks similar to this:
<PyKrita.krita.Krita object at 0x7f9128e48ff0\>
What's happening here? Krita.instance() returned an object. Because Python is an object-oriented programming language (OOP), almost everything in Python is either an object or class. In our case, our Krita.instance() object is a child of the Krita class.
There are a couple interesting functions in the Krita class: I'll take a look at one of the functions, Krita.createDocument(), but I encourage you to explore the documentation and see what other fun things you could print out!
Krita.createDocument() has 7 parameters (input values): 1 for the name of the document, and 6 of which match the options you can select when creating a new document in the GUI itself.
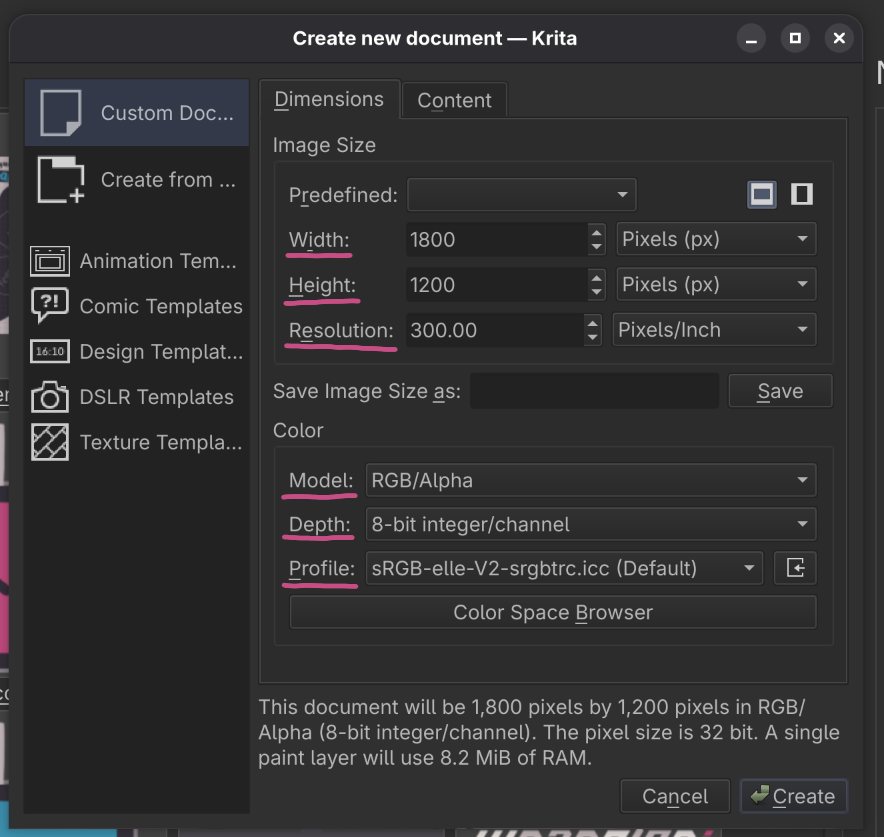
For more information on what arguments to pass to the Krita.newDocument() function, go to krita's class documentation and navigate to Public Slots 🡲 createDocument(). Go ahead and create a document with whichever arguments you'd like:
Krita.instance().createDocument(int width, int height, QString name, QString colorModel, QString colorDepth, QString profile)
Nothing happened, because a document, like Krita.instance(), is just an object. You'll have to assign your document to a variable, then add it to the view, which will show the document in the GUI.
myDoc = Krita.instance().createDocument(int width, int height, QString name, QString colorModel, QString colorDepth, QString profile)

      Krita.instance().activeWindow().addView(myDoc)
Actions
The most basic way for users to interact with Krita are actions. Actions are simple, pre-defined instructions that can be immediately executed. For example, all of the main menu buttons are actions.
There are 2 parts of an action:
- Signals are sent out when the user trigger an action (ie. Button pressed).
- Slots are the code that runs when a signal is sent out.
When an action is triggered, it sends out a signal, which is connected to a slot.
Krita has a variety of actions that can be triggered in a script: the Action Dictionary has a collection of actions available to you. Here's an example below:
Krita.instance().action('help_about_app').trigger()
To make your own action, make a QAction from the PyQt library (Krita's GUI framework):
from PyQt5.QtWidgets import QAction


      myaction = QAction("run my custom action")
and connect its signal to a slot:
def myfunc():

        print("hello from myfunc")


      myaction.triggered.connect(myfunc)
The GUI
Krita uses a framework called Qt (aka PyQt in Python) to display graphics. We'll make a simple pop-up that can be accessed from the main menu. First, import[1] PyQt and some of its modules so we can modify Krita's GUI.
from PyQt5.QtCore import *

      from PyQt5.QtGui import *

      from PyQt5.QtWidgets import *
Qt's API contains multiple modules for different purposes, the most common being QtCore (for non-GUI components), QtGui (for GUI windows, events, etc), and QtWidget (for GUI components like buttons).
To make the pop-up window, we need to make a QDialog object (and optionally name it):
mypopup = QDialog()

      mypopup.setWindowTitle("my awesome popup")
QDialogs need a QLayout to determine the position of widgets inside its window. A common layout is QVBoxLayout, which is used to vertically position widgets.
Go ahead and create a QVBoxLayout:
mylayout = QVBoxLayout()
We need to add widgets for our layout, like a button. A QPushButton works similarly to a QAction.
Create a QPushButton and connect its 'clicked' signal to a slot:
mybutton = QPushButton("click me!")

      mybutton.clicked.connect(myfunc) #this function is defined above
Then add it to the layout, and set the layout as the QDialog's layout:
mylayout.addWidget(mybutton)

      mypopup.setLayout(mylayout)
We're done with the pop-up window now! Run mypopup.exec_()[2] to open up the popup window. When you click the button, you'll get some output in the console below.
Let's add a menu to the main menu:
mainmenu = Krita.instance().activeWindow().qwindow().menuBar()

      mymenu = mainmenu.addMenu("my menu")
Create a QAction that runs mypopup.exec_() when its signal is triggered:
def openpopup():

        mypopup.exec_()


      mymenuitem = QAction("run my custom action")

      launchpopup.triggered.connect(openpopup)
Then add this action to the menu:
mymenu.addAction(mymenuitem)
Intro to plugins
Currently unfinished, work-in-progress. See Krita Scripting School for an alternate tutorial in the meantime!Krita plugins are Python packages (a folder of Python files) that execute when Krita first loads. Plugins are located in the pykrita folder. Here's the location of the folder for each operating system:
- Windows:
%APPDATA%\krita\pykrita - Linux:
~/.local/share/krita/pykrita - Apple:
~/Library/Application Support/Krita/pykrita
There are two types of plugins:
- Extensions are extended actions that can be found in Tools 🡺 Scripts.
- Dockers are a pop-up window that can be rearranged to fit on the screen.
Both types of plugins have the same folder structure. Here's what the folder structure of a Krita plugin looks like:
- pykrita
- myplugin
- __init__.py
- myplugin.py
- myplugin.desktop
The main python file (myplugin.py) is structured as a class.
__init__.py is the first Python file that gets executed when your plugin loads. Its job is to initialize the plugin.
from .myplugin import *

      Krita.instance().addExtension(myclass(Krita.instance()))
Resources
- Krita Scripting School: An official, introductory website for learning how to code with Krita.
- PyQt, Qt: Krita's GUI framework
- Krita's API Reference (C++)
- #wrangler and #wrangler-help: Dedicated help channels in the Hack Club Slack!